
TRS-80 hard drive emulator - FreHD

I was 13 years old when I first saw a computer, at an event in middle school. There were 4 TRS-80 model I, privately owned. I typed a BASIC program and the magic worked immediately, and years later, I ended with two engineering masters (CS and EE), and jobs in VLSI and software. I even moved to the Silicon Valley... (I am currently designing firmware in high-end servers). I got a model III two years later, but no floppy drive, they were too expensive. I replaced this machine later with an Apple //e. But the TRS-80 was the machine which got me addicted.
About 10 (or more) years ago, somebody gave me two model I with their monitors, one expansion, 3 drives, etc.. Both were working, and they end up in my basement. I moved to California, and my wife sold these 2 model I on ebay. I was amazed that an Australian guy won the auction : shipping cost was higher than the auction price.
Recently, I decided to look for another TRS-80, and I got lucky to buy a "broken" model 4 on ebay (for 60EUR). It was actually not broken, the brightness and contrast were simply set to bad values. I then decided to enhance this machine by adding a 3 1/2 floppy drives. The two original Tandon drives are still working, but I can't find decent media anymore. Then the next logical addition was the hard drive... finding a WD1010 hard drive in Europe is a real challenge. That's how I started looking a replacing the Tandy hard drive with a new one, based on flash storage.
Availability
I have sold 3 boards for beta-testers. Many thanks to those who tested this and helped me to get the code fixed. There has been a lot of improvements since the beta testing started. (I used Olimex for the prototypes, but it looks like they don't offer the prototyping service anymore). Components are also much cheaper if bought by 10 or more. I could also build a few boards and test them, or sell a few kits (please contact me directly for this). This project has no intent of making money, and is solely my contribution to these nice TRS80 machines which got me into compter sciences.Ian Mavric offered to build and distribute the emulators, please see his website.
The design.
The project is made with these constraints in mind :- Use SD-Card
- Easy to build (and reproducible)
- Open-sourced
- Easy to use
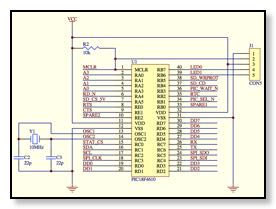
To make the project easy to build and reproducible, a trade-off on performance had to be taken. A fast implementation would use an FPGA (or some uC + CPLD), while a (little) slower one would use a microcontroller. I chose the 2nd option. A PIC18F4620 has enough flash space to hold the FatFS code, and is fast enough to interface to the Z80 bus. Furthermore, the PIC is happy with 5V and exists in DIP package. While the first prototype was using a 18F4610, the current boards use a 18F4620 in order to support the bootloader.
The decoding logic is done by a GAL. All operations are done by the PIC microcontroller, except reading the status register. The status register is polled by the TRS-80 when an operation (such as read sector, write sector, etc..) is happening. For performance reasons, the PIC cannot handle this because it would be continuously interrupted to provide the status register. Instead, the GAL recognizes a read to the status register, and a 8-bit register (74HC595) provides the data. The PIC doesn't even know when the TRS80 reads the status register.
The extras.
The FatFS code requires a real-time clock. The TRS-80 will also benefit from the RTC, so I added one based on the popular DS1307 chip. Since I still had place on the PCB (due to the 50-pins large connector), I also added a serial port. It helped to debug the code, but is now available to the TRS-80 (driver work required). The serial port is buffered in the PIC, and speeds up to 115200 bauds are supported.The code.
The code is based on Tim Mann's popular xtrs implementation. Of course, some of the code had to be adapted for the embedded environment, and the Z80 timing. The WD1010 datasheets, and the listing code of the Radio Shark hard disk driver were also extremely useful.Import and export.
The xtrs emulator provides import/cmd and export/cmd, which allow to move files between the host and the emulated TRS80. Since the PIC fully implements the FAT filesystem, I have created import2/cmd and export2/cmd, similar to their xtrs equivalents. Now moving files from/to the TRS80 is even easier : there is no need for a TRS80 emulator : you can copy files to the SD-Card, and import them on the TRS80.Results
The emulator is now working perfectly. It has been tested with TRSDOS6, LSDOS6.3.1 and LDOS 5 on different TRS-80 (model III and 4). The FatFS code has also been updated to the latest version (March 15, 2013) and tuned for performance.Technical details
The full schematics is here. The Z-80 generates the I/O read/write transactions by asserting IORQ* and places the address in A[7..0]. The emulator responds to 0xC0..0xCF. If the TRS is reading from 0xCF (status), the GAL asserts STAT_OE* and the status byte is provided by the 74HC595 without any intervention from the PIC. (This allows the PIC to proceed the previous actions, such as reading or writing a sector) while the TRS polls the status byte for the ready bit). If the TRS is reading 0xC0..0xCE or writing to 0xC0..0xCF, the GAL immediately asserts BUS_WAIT* and interrupts the PIC (by asserting PIC_SEL*). The PIC processes the interrupt as quickly as possible (code written in assembly, and heavily optimized). At this point, the PIC has 2 options :- return or process the data directly
- clear the READY bit in the STATUS register and return. An action is triggered and executed from the main loop.
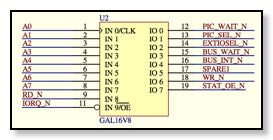
/** Inputs  **/
Pin [1..8]   =  [A0..7]  ;
Pin 9  =  !RD_N ;
Pin 18  =  !WR_N ;
Pin 11  =  !IORQ_N ;
Pin 12  =  !PIC_WAIT_N ;

/* not used but connected */
Pin 16 = BUS_INT_N ;
Pin 17 = SPARE1 ;

/** Outputs **/
Pin 13  =  !PIC_SEL_N ;
Pin 19  =  !STAT_OE_N ;
Pin 14  =  !EXTIO_SEL_N ;
Pin 15  =  !WAIT_N ;

/* we are selected when address is 1100....  and IORQ is asserted */
sel = A7 & A6 & !A5 & !A4 & IORQ_N ;

/* status register is at address 11001111 */
status = A3 & A2 & A1 & A0 ;
stat_sel = sel & status & RD_N ;
pic_sel = (sel & status & WR_N) # (sel & !status & (RD_N # WR_N)) ;

/* the PIC handles all requests except reading the status */
STAT_OE_N = stat_sel ;
PIC_SEL_N = pic_sel ;

/* WAIT_N is generated by the PIC */
WAIT_N = pic_sel & PIC_WAIT_N ;

/* EXTIOSEL allows the TRS80 to read */
EXTIO_SEL_N = sel & RD_N ;
The PIC connections don't need any particular comments. The SPI interface is used to communicate with the SD-card (3.3V is done with simple voltage dividers, and SPI output from the SD-card is converted to 5V with a small mosfet transistor) and the status register. The UART is connected to a MAX232 chip. I2C to the DS1307 is bit-bang'ed. The DS1307 is read every day at midnight (or at cold reset), and the PIC maintains the time itself, using a 1Hz interrupt generated by the DS1307. PORTD goes to the Z80 data bus (buffered by a 74HCT245 bus driver)
Bootloader
A robust bootloader has been added. It occupies the first sector of the PIC. It acts as follow :
- The reset vector jumps to the bootloader. The bootloader computes a CRC16 of the application flash (0x800-0xFFFD) and compares it with the CRC stored in flash (0xFFFE-0xFFFF). If both CRC16 match, then a flag is set. If the CRC don't match, bootloader mode is entered.
- The bootloader then compares the CRC16 with another copy, stored in eeprom (0x3FE-0x3FF). If the CRC matches again, the code jumps to application mode. If not, the code goes into bootloader mode.
- In bootloader mode, both LEDs are lit and the PIC waits for the TRS80 to send an intel-hex file. If the flash was validated at step 1, the bootloader will wait about 30 seconds before rewriting the correct CRC in eeprom and jump to application mode. [This allows auto-recovery if bootloader was entered by mistake]
- FUPDATE/CMD is provided to flash the emulator. The typical procedure is to import the new code (hex file) on a floppy disk, using IMPORT2/CMD. Then reboot the TRS80 from a floppy, and run FUPDATE/CMD to update the PIC. The whole procedure takes about one minute.
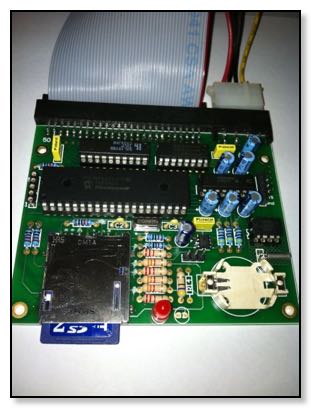
PCB
The board takes 80x80mm, double-sided. Components are through-holes, although it would be trivial to make another board with surface-mounted components.
Demo
A few videos, showing how easy the board is used, are coming... Ian posted one here on youtube, and another one here.
Source code
I am releasing all the source code, PCB and all required files to build the emulator from scratch to the open source community. A zip archive is available in the download section. (Updated January 23rd 2014, version 2.14)As always, comments are welcome. Send them by email !